Sharing as a Service Integration Guide
Sharing as a Service (ShaaS) provides an easy way for users to securely share documents from within another application using the power of ShareBase. This lightweight integration consists of a set of focused web components and public API endpoints, which require minimal configuration and offer full administrative control.
When sharing documents through another application, users specify the email addresses of the share recipients, who are notified that documents have been shared with them. Within ShareBase, each share is compartmentalized into a separate folder secured by an access code. Shares can expire after a designated period (subject to deployment expiration settings), and they can be revoked through an easy-to-use UI.
Integrators and site administrators alike can set default sharing permissions and settings, which are enforced across the deployment through user groups. This provides the high level of administrative control expected from ShareBase, without the full-scale configuration that is typically required. Instead of requiring a separate user account for everyone who uses this service, ShaaS accomplishes every interaction with a single ShareBase user.
Terms and Definitions
-
Documents: ShareBase documents are the files stored and shared within ShareBase. In the context of ShaaS, documents can be uploaded and downloaded within ShareBase.
-
Folders: Folders are the structures in which you store documents. In the context of ShaaS, folders can be created and shared within ShareBase.
-
Libraries: ShareBase libraries are the overarching spaces in which you work with documents. Libraries allow you to organize a group of folders around a given function. Libraries contain folders, which contain documents. Libraries cannot contain documents directly.
-
Libraries can be personal or corporate. Your personal library, My Files, is automatically created when you sign in to ShareBase for the first time. You cannot create additional personal libraries. Corporate libraries are shared across multiple users and are created by an administrator.
-
User Groups: User groups help simplify and organize the sharing of documents and folders with multiple ShareBase users or departments within your organization. For example, separate user groups can be created for employees in Human Resources, Accounting, and Operations.
-
Shares: In the context of ShaaS, you can create shared links with access codes to different folders. Shared links allow individuals without ShareBase accounts to view and/or download documents. Shared links can be set to expire after a designated period, or they can be left open indefinitely.
-
Email Access Code: Before accessing shared content, recipients will need to enter an access code to verify their identity. A new access code is generated and emailed to the recipient each time the recipient attempts to access the link.
-
Integrator: The individuals implementing the ShaaS integration.
-
Client: The line-of-business application that is modified to use the ShaaS integration. All requests made to the ShareBase API will be done through the Client.
-
User: End user of the line-of-business application: someone who has credentials to be using that system and has access to the ShaaS interaction. The users mentioned within this guide are not necessarily ShareBase users, unless explicitly labeled as such.
-
LogMetadata: A way to associate information to a particular folder and/or share. When ShareBase logs activity (that a folder was created, a share link was created, etc.), it stores the contents of the
LogMetadataheader as well, allowing the Integrator to pass user information to ShareBase. -
The
LogMetadatais composed of the following:-
UserName: A string containing a name or email address of the user to attribute the share to. ShareBase records this value in the Activity Log. -
OrganizationalUnit: A free-form string allowing the integrator to pass up information they deem necessary to associate with the share. An example would be the department of the user.
-
-
See Creating a Folder under Creating a New Share with ShaaS for more information.
To learn more about the structuring of content in ShareBase, please visit the Libraries and Folders section of the ShareBase Developer's Guide.
Configuration Overview
Consumption of ShaaS requires an active ShareBase deployment with an administrative account that has permission to create users and API tokens within a deployment.
The administrative account is used to create a Bearer token, which requires a user account to be associated with it. If you want to specify security and permission settings for created shares in the ShaaS interaction, you may do so through the creation of a User Group Policy.
These steps can be accomplished in ShareBase Administration using a Site Administrator ShareBase account, as outlined in the following sections.
Creating the ShaaS User
You can create the ShaaS user account in ShareBase Administration. Navigate to the Users page, and select the Create User icon to create a new user.
Note
It is recommended that this dedicated "service account" does not have administrative rights, since this ShareBase user performs actions that any user can perform, such as uploading documents and sharing folders.
These credentials SHOULD be recorded for use in the Creating a Bearer Token step since this will allow for easy distinction from other active users in the system.
Creating a Bearer Token
In ShareBase Administration, navigate to the API Tokens page. Create a Bearer token using the credentials of the ShaaS user account. This is the account that ALL ShaaS interactions will be performed under.
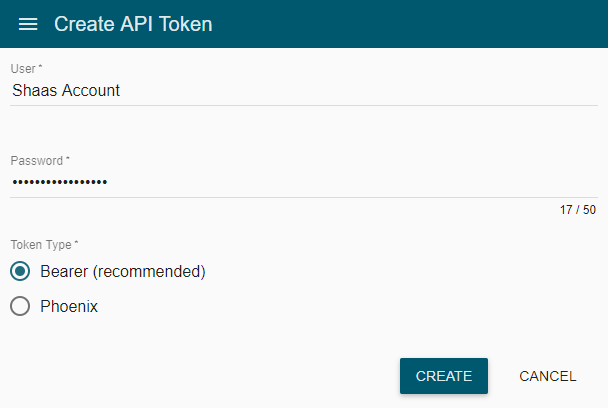
The created token will be passed along in the requests made by the Client to the ShareBase API. It is recommended that the token be recorded for future use.
Configuring User Groups and User Group Policies (Optional)
ShareBase allows site administrators to organize users into groups, allowing security and permission settings to be configured across the entire group.
To begin, navigate to the User Groups page and select the Create Group icon to begin creating your user group. Ensure that you select the user you want to add to this created user group.
After you create the user group, you may select it from the list on the User Groups page to customize the policies that determine the permissions of users within that group. From here, you can select settings that allow you to restrict the permissions and security of the shares of anyone in this user group.
When ShareBase checks the policies and settings for a specific user, it respects the most restrictive options set. For example, if User A is in two User Groups, one group that allows sharing by a link and one group that forbids it, this user will NOT be able to share by link.
Important Notes
The rest of this guide references specific endpoints exposed in the ShareBase Public API, omitting the base portion of the URL. For information about the base URL, please refer to the ShareBase Developer's Guide.
All API calls MUST be made with the Authorization header, containing the Bearer token created in the Creating a Bearer Token section in the following format:
Authorization: Bearer 79dc5360d6e50ad0919b9c50eacf9721
Because of the lightweight configuration of this service and the overarching authentication used by the Bearer token described above, ShareBase differentiates users solely through the use of the LogMetadata header. It is your responsibility to keep track of which users created a share from the line-of-business application.
Capturing the identifying information is the only way to revoke shares once created, as described in the Revoking Shares section. It is recommended to store the ShareId created by a user of your line-of-business application with the identifying information about that user to associate them with their shares.
Note
The ShaaS components will adapt to fill any screen size, but the following dimensions are recommended:
- Create a Share: 655 x 670
- Manage Shares: 485 x 770
Creating a New Share with ShaaS
URI Discovery
To begin the ShaaS interaction, query the HOME endpoint for URI discovery of various endpoints relevant to the ShaaS interaction. Using the Bearer token created in the Creating a Bearer Token section, perform a GET request to the HOME endpoint detailed below:
GET api/home
Authorization: Bearer 79dc5360d6e50ad0919b9c50eacf9721
A 200 HTTP status is returned with a response body specifying, among other links, URIs relevant to the ShaaS integration:
{
    [...]
    "Libraries": "https://app.sharebase.com/sharebaseapi/api/libraries",
    "CreateFolderUri": "https://app.sharebase.com/sharebaseapi/api/libraries/{libraryId}/folders",
    "CreateShareUri": "https://app.sharebase.com/sharebaseapi/api/folders/{folderId}/share",
    "CreateShareTokenUri": "https://app.sharebase.com/sharebaseapi/api/tokens/create-share",
    "UpdateShareUri": "https://app.sharebase.com/sharebaseapi/api/folders/shares/{shareId}",
    "ManageSharesTokenUri": "https://app.sharebase.com/Sharebase-api/api/tokens/manage-shares",
    "ManageSharesUri": "https://app.sharebase.com/sharebaseapi/shaas/shares{?access}"
    [...]
}
The URIs returned are the building blocks of the ShaaS integration, and will be referenced later in this guide. It is recommended that the Integrator record these URIs for future use.
Creating a Folder
Documents stored in ShareBase are organized by folders, and the first step in creating a share is to create a folder for the documents to reside in. To do so, perform a POST request to the CreateFolderUri, including a header of LogMetadata and the libraryId.
Note
A list of all Libraries the current ShareBase user has access to can be found by querying the GET /api/libraries endpoint, found in the response of the above HOME endpoint. We recommend using the My Library of the service account user.
POST /api/libraries/{libraryId}/folders
Authorization: Bearer 79dc5360d6e50ad0919b9c50eacf9721
LogMetadata: { "UserName":"JohnDoe@Company.com", "OrganizationalUnit":"Sales" }

{
    "AutoGenerateName": true
}
- The body of the request MUST specify the following:
AutoGenerateName: a Boolean indicating that the API should create a random GUID as the folder name.- The headers of the request MUST also contain a header called
LogMetadata. - The
LogMetadataheader MUST contain aUserNameandOrganizationalUnitin the format outlined in the above request. The purpose of theLogMetadataheader is described above.
The ShareBase API creates a new folder, which it uses to group the incoming documents and to manage the share.
- A 200 HTTP status is returned with a variety of information about the folder, most importantly the
FolderId:
{
    "FolderId": 10121,
    "FolderName": "b601aa85-a6fa-47a5-b6b0-a00e10ac982b",
    "LibraryId": 1,
    "Links": {
    [...]
}
FolderId: ShareBase's unique identifier for the folder. It is recommended for the Integrator to record this FolderId as it is used to create the folder share.
Creating a Pending Folder Share
Using the returned FolderId from the previous step, issue a POST request to the CreateShareUri endpoint, including the same LogMetadata header as before and the below body.
POST /api/folders/{folderId}/share
Authorization: Bearer 79dc5360d6e50ad0919b9c50eacf9721
LogMetadata: { "UserName":"JohnDoe@Company.com", "OrganizationalUnit":"Sales" }

{
    "AllowView" : true,
    "Status" : "Pending"
}
Status: This property prevents the share from being accessed before any documents or options have been added to the share.
A 200 HTTP status is returned with a response body specifying the following:
{
    "ShareId": 169,
    "FolderId": 10121,
    "Status": "Pending",
    "ReferenceString": "1-op92-XNehfNUFVONyo5oNzUr8R4_",
    "Link": "https://app.sharebase.com/#/folder/10121/share/1-op92-XNehfNUFVONyo5oNzUr8R4_",
    "Links": {
        "WebUri": "https://app.sharebase.com/#/folder/10121/share/1-op92-XNehfNUFVONyo5oNzUr8R4_",
        "Self": "https://app.sharebase.com/sharebaseapi/api/folders/10121/share/169"
}
ShareId: The unique identifier for this new share. When displaying the Manage Shares screen, you have the ability to include exactly which shares are relevant to the current context of your application. Therefore, you may find it helpful to store theShareIdalong with any contextual information, such as the current user, customer, or account number.
Redeeming a Temporary Bearer Token
The next step in creating a new share is to redeem a Temporary Bearer Token, which has a restricted lifetime. This allows for the transmission of this token via query string parameters.
The LogMetadata information (UserName and OrganizationalUnit) is passed along as part of the token request and captured in the token instead of the header as in previous requests. This is another way that ShareBase associates the information you deem necessary with actions performed on the share.
To begin, issue a POST request to the CreateShareTokenUri endpoint returned via the HOME endpoint.
- The body of the request specifies the following:
POST api/tokens/create-share
Authorization: Bearer 79dc5360d6e50ad0919b9c50eacf9721

{
    "UserName": "JaneDoe@Company.com",
    "ShareId": 42,
    "OrganizationalUnit" : "Sales"
}
UserName: A string containing a name or email address of the user to attribute the share to. ShareBase will record this value in the Activity Log.ShareId: The unique identifier for this new share.OrganizationalUnit: A free-form string allowing the integrator to pass up information they deem necessary to associate with the share. An example would be the department of the user.
A 200 HTTP status is returned with a response body specifying the following:
{
    "ExpiresIn": 900,
    "ShareWebUri": "https://app.sharebase.com/#/shaas/shares/42/configure?access=3947961e0aadb4201cdb86b3e1abe729",
    "AccessToken": "3947961e0aadb4201cdb86b3e1abe729",
    "TokenType": "Bearer",
    "Error": null
}
ExpiresIn: The lifetime of the token, expressed in seconds.ShareWebUri: The URL used to configure the share by opening in a browser or web view, contains the token already appended.AccessToken: The token value.TokenType: The token type.Error: A field describing any errors in creating the token.
Record this token for use in the Configuring a Share's Settings and Permissions section.
Warning
If the above token expires, a new token will need to be created as there is no way to "refresh" the current token.
Finalizing the Share Creation Interaction
Note: The Uploading and Configuring steps outlined below may occur in either order or in parallel.
Uploading Documents
To upload documents to the share, follow ShareBase uploading procedures outlined in the upload section in the ShareBase Developer's Guide.
Note
While it is possible to use the Temporary Bearer Token created in the Redeeming a Temporary Reference Token section, the shortened lifetime of the token may be inadequate for larger upload sessions. We recommend using the Bearer token created in the Creating a Bearer Token section above to simplify the interaction.
Once all documents have been uploaded, issue a PATCH request to the UpdateShareUri endpoint to update the Status of the Share.
- The body of the request MUST match the following:
PATCH api/folders/shares/{shareId}
Authorization: Bearer 79dc5360d6e50ad0919b9c50eacf9721

[
    {
        "op": "replace",
        "path": "Status",
        "value": "-NeedsUpload"
    }
]
Note
The formatting of this request is slightly different from other request bodies in the ShareBase API. Because of the specificity of this request, the body MUST match the above example.
The ShareBase API updates the Status of the share, marking the upload as complete, and returns the following response.
{
    "ShareId": 177,
    "FolderId": 10129,
    "Status": "NeedsOptions",
    "ReferenceString": "1-rZweTXbmR-y--TChK673y8CjqW83k_",
    "Link": "https://app.sharebase.com/#/folder/10129/share/1-rZweTXbmR-y--TChK673y8CjqW83k_", // Deprecated
    "Links": {
        "WebUri": "https://app.sharebase.com/#/folder/10129/share/1-rZweTXbmR-y--TChK673y8CjqW83k_",
        "Self": "https://app.sharebase.com/sharebaseapi/api/folders/{folderid}/share/177"
    }
}
Configuring a Share's Settings and Permissions
This portion of the ShaaS interaction is handled by a set of ShareBase web views, the URI of which is returned from the Redeeming a Temporary Reference Token section as the ShareWebUri.
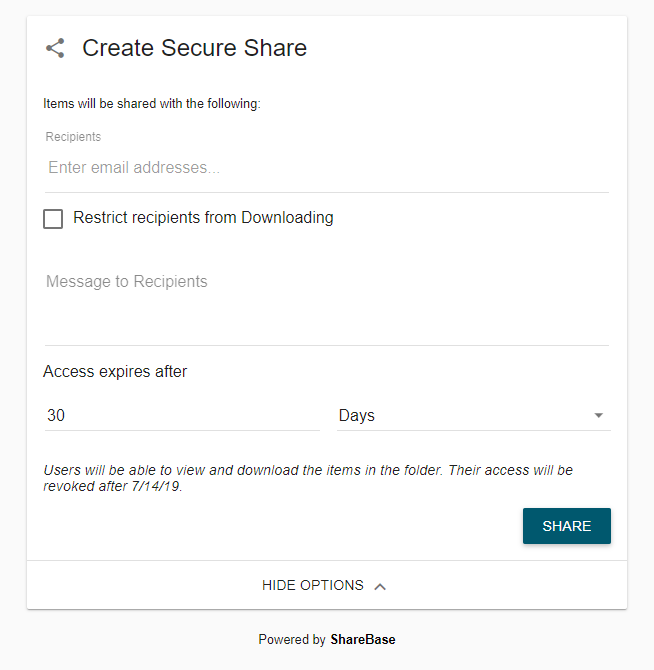
Next, present the configuration screen to the user from within the line-of-business application, by using a webview or browser window that references the ShareWebUri. Once all of the desired options have been filled out and the SHARE button has been clicked, the share is now viewable and emails will be sent to the recipients added to the share. Keep in mind that if this step occurs before the Uploading Documents step, the share will be accessible, but it will not have documents to display.
- The available options will be based on the rights of the supplied API token from the Configuration Overview section, which are set based on the user that the token was created for.
- This may include settings such as retention period, link expiration, and document rights.
Managing Secure Shares
Now that your users have successfully uploaded documents and set the permissions and options of their shares, they may wish to review information about their shares or revoke the shares. To do so, first redeem a Bearer API token for a Manage Shares Token.
Redeeming a Bearer API token for a Manage Shares Token is done by issuing a POST request to the ManageSharesToken endpoint, and the body of the request specifies the following:
POST api/tokens/manage-shares
Authorization: Bearer 79dc5360d6e50ad0919b9c50eacf9721

{
    "UserName": "JohnDoe@Company.com",
    "ShareIds": [42, 56, 99],
    "OrganizationalUnit": "Sales"
}
UserName: A string containing a name or email address of the user to attribute the share to. ShareBase will use this value for the Activity Log (if needed).ShareIds: A number array of share ids that will be the only shares the created token can view and access.OrganizationalUnit: A free-form string allowing the integrator to pass up information they deem necessary to associate with the share. An example would be the department of the user.
A 200 HTTP status is returned with a response body specifying the following:
{
    "ExpiresIn": 900,
    "ShareWebUri": "https://app.sharebase.com/#/shaas/shares?access=3ffece96ea85c33265e9844eaf2b0e43",
    "AccessToken": "3ffece96ea85c33265e9844eaf2b0e43",
    "TokenType": "Bearer",
    "Error": null
}
ExpiresIn: The lifetime of the token, expressed in seconds.ShareWebUri: The URL used to manage the share by opening in a browser or web view, with the Bearer token already appended.AccessToken: The token value.TokenType: The token type.Error: A field describing any errors in creating the token.
To open up the Manage Secure Shares web view, use the ShareWebUri returned via the ManageShares endpoint.
The ShareBase UI presents the shares to the user, who can then interact with their created shares. Users can review all of the details about the shares, including recipients, permissions, a list of share documents, and expiration information. Additionally, users can easily revoke their secure shares by selecting the "X" next to the share.
